Thai chili oil paste has always been in the background of the most iconic Thai dish; Tom Yum (Thai spicy and sour soup), plus many less known Thai dishes. The paste is made by frying a paste of chili, shallot and garlic in mild-flavored oil. The result is not only spicy oil infused with color of the paste, but also a little sweet and nutty aroma. It can be enjoyed as a condiment in soup, stir-fries and salads. It could also be mixed with tamarind juice, palm sugar and minced dried shrimps to make bread spread.
Nowadays not many people make this paste at home anymore, as it has been mass produced and widely available in supermarkets. As a result, the recipe is somewhat lost to most modern households. Most commercial versions add a lot of sugar to make the taste sweeter, while traditional flavor would focus on 3 tastes; sweet, sour and spicy. Yes, Thai cuisine considers spicy as a taste. It is the same as the four basic tastes in western cuisine. That is a reason why the food is so spicy! But do not worry; in this post I will also discuss how to adjust the spiciness level to your preference.

Today’s recipe is a simple version; ingredients are simplified, as well as the cooking method. It doesn’t involve dry-roasting any ingredients. Normally, chilies and other ingredients are dry-roasted one by one to chase away moisture and intensify flavor. However, I would not recommend this, if you have a kitchen that connects to your living area. Because the smell from dry roasting dried chilies is… well… literally irritating.
When I was a student in Europe, I heard many stories about cooking authentic Thai food aboard. A story that intrigued me the most is about some local neighbors mistook the smell of dry-roasting chilies as some sort of tear gas, panicked and called the police. Yes, it might sound exaggerated. But just by inhaling the smoke, irritations would travel along your nostril track straight to your throat and then to your eyes. It is only logical for those who have NEVER EVER experienced this before to easily mistake it as a kind of chemical gas. But don’t be discourage in making this recipe, as long as you put your cooking hood on high fan, there should be no problem.
The next thing now is to choose chilies. Seeing many types of fresh and dried chilies available in supermarket is enough to have a headache. (For this recipe, we will need dried chilies not the fresh ones.) My rule of thumb is the bigger it is the less spicy it gets. To make this recipe, I choose the biggest available dried chili that I could get my hands on, as we eat rather mild food (for Thai standard) in our family. But you can blend different kind of dried chilies to suit your preference.
Here are ingredients to make about almost a full jar of 50ml. of Thai chili oil paste;
- 30g Dried chili, SEEDED* and cut into fine pieces
- 1/2 cup Asian shallots, sliced
- 1/4 cup Garlic, sliced
- 1 tsp. Salt
- 1/4 cup Vegetable oil or to cover the paste
*The more seeds, the spicier it gets.
Directions;
It takes total time of around 25-40 minutes to make this recipe; 5-10 minutes for preparation and around 20 minutes to cook. Let’s start cooking.
-

Grind dried chili to powder Make chili powder. As mentioned before, the traditional way is to dry-roasting every ingredient one by one. Unless you have an outdoor or open-air kitchen (and understanding neighbors), I do not recommend dry-roasting dried chilies. For this recipe, the first thing to do is to grind dried chilies into powder by using blender or mortar and pestle. Make sure the powder is as fine as possible.
-

Mix all dried ingredients and grind into a paste Make a paste. Blend all ingredients in a blender or a food processor. I chose a mortar and a pestle as my weapon of choice. But if you plan to make a bigger batch, you will need all the help you can get. Again, try to make the paste as fine as possible.

Fry the paste until its color changes and is well combined - Fry the paste in oil for 20-30 minutes. Add vegetable oil in a saucepan on medium heat. Fry the paste and stir frequently. If the paste looks dry, add more oil. Continue to fry until the color gets darker and the paste is well combined. This should take 20-30 minutes, depends on how much paste you fry.

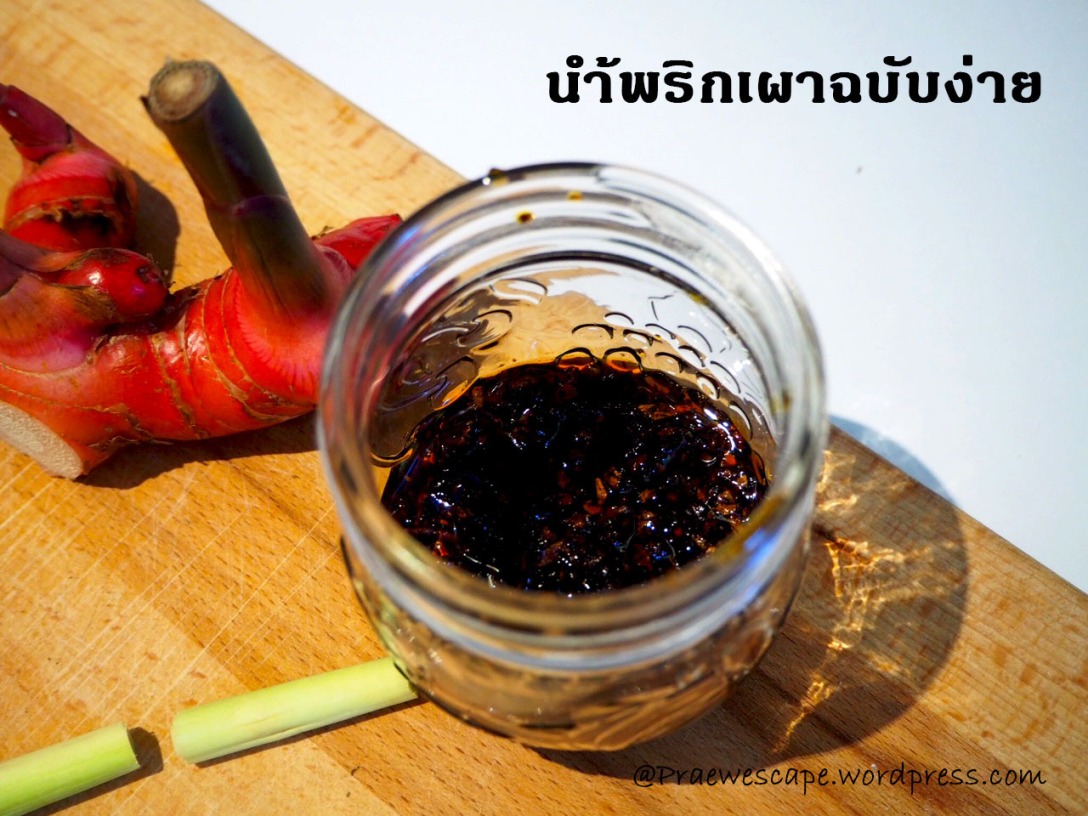
Once the paste is done, transfer to a container. Wait for the oil paste to cool down, and then close the lid. The paste generally separates into 2 layers of a dark-colored paste and fiery red oil generally floats on top. The paste can be kept in a dry place for 3-4 months or until the smell change.
Simplified Thai Chili Oil Paste (Nam Prik Pao)
A simple way to make a fiery red Thai condiment at home.
Ingredients
- 30g Dried chili, seeded* and cut into fine pieces
- 1/2 cup Asian shallots, sliced
- 1/4 cup Garlic, sliced
- 1 tsp. Salt
- 1/4 cup Vegetable oil or to cover the paste
Directions
- Make chili power by using a blender, food processor or mortar and pestle. Make as fine powder as possible.
- Make paste by blending all ingredients in a blender or a food processor. Mortar and pestle can be used also to grind and combine all ingredients into a fine sticky paste.
- Fry the paste in oil for 20-30 minutes by heating vegetable oil on medium heat. Add the paste and stir frequently until the color turns darker and the paste is well combined.
- Transfer the paste to a container. Leave it to cool, put a lid on once cooled. Close the lid tightly and store in dry place.
Praewescape.wordpress.com
I would like to hear from you! Feel free to like or share your thoughts and questions in the comment. For more on behind the scene pictures or news about new recipes at, please follow our Facebook fan page at https://www.facebook.com/Praewescape. Hope to see you again and enjoy cooking chemical-free homemade!
I am the target text.
น้ำพริกเผาฉบับง่ายทำเองได้ที่บ้าน
สวัสดีค่ะ วันนี้แพรวเอาสูตรน้ำพริกเผาฉบับง่ายมาฝากกัน สำหรับสูตรนี้จะเน้นความง่ายตั้งแต่ใช้ส่วนผสมน้อยอย่าง และลดขั้นตอนการคั่วส่วนผสมลงเพื่อความง่ายและความเหมาะสมกับครัวที่มีพื้นที่จำกัด สูตรนี้จะเน้นน้ำพริกเผาที่เหมาะสำหรับใช้ประกอบอาหาร เช่นต้มยำ สารพัดผัด และยำๆ แต่ถ้าหากเพื่อนๆ อยากใช้ทาขนมปังจะต้องปรุงรสเพิ่มด้วยน้ำมะขามเปียก น้ำตาลปี๊บและกุ้งแห้งได้ตามใจชอบค่ะ
ทุกวันนี้ ไม่ค่อยมีใครทำน้ำพริกเผาทานเองที่บ้าน อาจจะเพราะว่าหาซื้อได้ตามซุปเปอร์ได้สะดวก ทำให้หลายสูตรก็ถูกลืมเลือนไปกับเวลา ซึ่งถ้าอยากได้รสชาติเหมือนแม่ประนอม เพื่อนๆ สามารถปรุงรสต่อได้เอง ในแง่ความง่ายของสูตรนี้คือแพรวไม่คั่วส่วนผสมก่อนตำตามแบบดั้งเดิม เพราะว่าสมัยนี้หลายบ้านไม่มีครัวเปิดเหมือนเมื่อก่อน ยิ่งถ้าคั่วพริกแห้งในครัวปิดคงจะเหมือนระเบิดแก๊สน้ำตากันเลยทีเดียว อันนี้ออกจะฟังเหมือนเว่อร์ แต่แพรวเคยได้ยินเรื่องเล่าสมัยตอนเรียนต่างประเทศ ว่าเคยมีเหตุการณ์ที่เพื่อนบ้านคนท้องถิ่น ตกใจเมื่อได้กลิ่นเพื่อนบ้านไทยคั่วพริกแห้งเพราะเข้าใจว่าเป็นกลิ่นสารเคมี ขนาดโทรเรียกตำรวจกันเลยทีเดียว ซึ่งอันนี้ก็พอเข้าใจได้เพราะกลิ่นคั่วพริก ถ้าใครไม่เคยดมก็คงไม่รู้ว่ามันทั้งแสบและระคายเคืองตั้งแต่จมูก คอ ยันตาเลยทีเดียว แต่สำหรับสูตรนี้ถ้าทำในครัวปิดให้เปิดที่ดูดควันไว้สูงสุดก็น่าจะโอเค
ตอนนี้ก็ถึงเวลามาเลือกพริกกันค่ะ สูตรนี้จะใช้พริกแห้งนะคะ สำหรับคนที่ไม่อยากให้น้ำพริกเผาออกมาเผ็ดมากแนะนำให้ใช้พริกชี้ฟ้าแห้ง ถ้าใครอยากได้ของแรงก็ใช้พริกขี้หนูแห้ง ซึ่งเพื่อนๆ สามารถลองผสมพริกหาสัดส่วนที่ให้ระดับความเผ็ดตามชอบได้นะคะ ตอนนี้เรามาดูส่วนผสมสำหรับน้ำพริกเผาฉบับง่ายกันเลยค่ะ สูตรนี้จะพอใส่โหลขนาดประมาณ 50 มิลลิลิตร
- พริกแห้ง แยกเมล็ดและหั่นเป็นชิ้นเล็กๆ 30 กรัม
- หอมแดงซอย 1/2 ถ้วยตวง
- กระเทียมซอย 1/4 ถ้วยตวง
- เกลือ 1 ช้อนชา
- น้ำมันพืช 1/4 ถ้วยตวง เพิ่มได้ให้ท่วมน้ำพริก
ใช้เวลาทั้งหมดประมาณ 25-40 นาที ประมาณ 5-10 นาทีเพื่อเตรียมส่วนประกอบ และ 20-30 นาทีในการผัดน้ำพริกเผา เรามาดูขั้นตอนการทำกันเลยค่ะ
-
ตำพริกแห้ง เริ่มต้นด้วยทำพริกป่น ถ้าใครมีครัวเปิด ก็ลองทำแบบวิธีดั้งเดิมที่เริ่มจากการคั่วส่วนผสมทีละอย่างได้นะคะ ส่วนของสูตรนี้จะเริ่มต้นที่ขั้นตอนการบดพริก ซึ่งอันนี้เพื่อนๆ จะเลือกใช้อุปกรณ์อะไรก็ได้ตามความถนัด ไม่ว่าจะเป็นเครื่องปั่น เครื่องผสมอาหาร หรือครกแบบบ้านๆ ของเรา แนะนำว่าป่นให้ละเอียดมากที่สุดเท่าที่ทำได้นะ เพราะเวลาไปใช้ทำอาหารต่อจะได้ไม่มีเศษเยอะ
-
ตำน้ำพริก ตำน้ำพริก เลือกอุปกรณ์ตามถนัดแล้วปั่น หรือตำส่วนผสมทั้งหมดจนกระทั่งได้น้ำพริกเนียนๆ ออกมา ถ้าเพื่อนๆ อยากทำจำนวนเยอะขึ้นแนะนำให้ใช้เครื่องทุ่นแรงนะคะ เพราะเราอยากได้น้ำพริกที่ละเอียดเท่าที่ทำได้
ผัดบนไฟกลางจนสีเปลี่ยน และเริ่มเป็นเนื้อเดียวกัน - เผาน้ำพริก 20-30 นาทีในน้ำมัน เริ่มจากตั้งน้ำมันพืชในกระทะบนไฟกลาง แล้วใส่น้ำพริกลงไปผัด ถ้าส่วนผสมดีแห้งไป ให้ใส่น้ำมันเพิ่มนะคะ แล้วผัดไปเรื่อยๆ จนกระทั่งสีเข้มขึ้นจนเกือบดำ และส่วนผสมเข้ากันดี ซึ่งน่าจะใช้เวลา 20-30 นาที แล้วแต่จำนวนน้ำพริกที่ผัด
เมื่อน้ำพริกเผาได้ที่แล้ว ให้เทใส่ภาชนะ รอจนเย็นแล้วค่อยปิดผา จะเห็นว่าน้ำมันจะลอยอยู่ข้างบนและตัวน้ำพริกอยู่ข้างล่าง สามารถเก็บไว้ในภาชนะปิดผาในที่แห้งได้ประมาณ 3-4 เดือน หรือจนกระทั่งเริ่มเหม็นหืน
น้ำพริกเผาฉบับง่าย
น้ำพริกเผาแสนง่าย ที่ใครๆ ก็ทำเองได้ที่บ้าน
”ส่วนผสม”
- พริกแห้ง แยกเมล็ดและหั่นเป็นชิ้นเล็กๆ 30 กรัม
- หอมแดงซอย 1/2 ถ้วยตวง
- กระเทียมซอย 1/4 ถ้วยตวง
- เกลือ 1 ช้อนชา
- น้ำมันพืช 1/4 ถ้วยตวง เพิ่มได้ให้ท่วมน้ำพริก
”วิธีทำ”
- ป่นพริก โดยเลือกใช้เครื่องปั่น เครื่องผสมอาหาร หรือครกตามความถนัด จนกระทั่งได้ผงพริกที่ละเอียด
- ตำน้ำพริก โดยปั่น หรือตำส่วนผสมทั้งหมดในเครื่องปั่น หรือครก จนกระทั่งได้น้ำพริกที่เนียนละเอียด
- ผัดน้ำพริกในน้ำมันบนไฟอ่อนประมาณ 20-30 นาที คนบ่อยๆ จนกระทั่งเปลี่ยนสีเป็นสีเกือบดำ และส่วนผสมเข้ากันดี
- เมื่อได้ที่เทใสภาชนะ ทิ้งให้เย็นแล้วปิดฝา เก็บในที่แห้ง
Praewescape.wordpress.com
ถ้าใครชอบสูตรที่แชร์ ก็กด Like หรือ Comment ได้ทั้งในบล็อก หรือใน Facebook fan page และติดตามได้ที่ https://www.facebook.com/Praewescape สำหรับเบื้องหลังสูตรอาหารใหม่ๆ ขอให้สนุกกับการทำอาหารโฮมเมดปลอดสาร แล้วเจอกันค่ะ

goodness that looks delicious! thanks for sharing 🙂
LikeLiked by 1 person
I’m glad that you like it! I’ll be sharing more recipes that use this condiment soon. /Praew
LikeLiked by 1 person
do you know any good vegetarian dishes?
LikeLiked by 1 person
@DA-AL, you can replace meat with tofu for most of my recipes on this blog. You comment gave me idea of adding a vegetarian section on the recipes. Thanks! /Praew
LikeLike
Reblogged this on mamabatesmotel.
LikeLike